Tame Your Dynamic IP: A Cloudflare Worker Solution for Unifi
Tyler Harris
Ever been frustrated with that pesky dynamic IP address from your ISP? You know, the one that changes every so often, usually when you least expect it, and you're left wondering why your services are down or your remote access isn't working? While there are many Dynamic DNS (DDNS) services out there, I wanted to explore a seamless solution connecting my Cloudflare DNS with my Unifi network, leveraging Cloudflare Workers to keep my DNS records up-to-date.

The DNS Strategy: One Record to Rule Them All
The first step in this process is to create a DNS record in Cloudflare that will be updated with your dynamic IP address. This record will be the primary record, other subdomain services can CNAME to this primary record. This way, you only need to update the primary record, and all other dependent subdomains will automatically be updated with the new IP address.
Primary DNS Record:
dyndns.example.comordns.example.comas anArecord to the IP Address. This is the record that will be updated with the dynamic IP address.Service Subdomains:
service1.example.com,service2.example.com, etc. (CNAMEto the above primary record).

Cloudflare Worker: The Dynamic IP Handler
Next, we need to create a Cloudflare Worker that will handle the incoming requests from the Unifi network and update the DNS record with the new IP address. The Cloudflare Worker will be the endpoint that Unifi will call every time the IP address changes.
This Cloudflare Worker acts as the middleman between your Unifi network and Cloudflare's DNS API. Cloudflare Workers are like tiny programs that run on Cloudflare's global network of servers, allowing you to execute code close to your users and build incredibly fast and efficient applications. They're perfect for tasks like handling API requests, modifying web pages on the fly, and, of course, managing dynamic DNS!

Here's the breakdown:
- Enforces HTTPS to ensure all communication is encrypted.
- Requires a valid Cloudflare API Key with appropriate permissions to update the DNS record.
- Requires a valid Domain name or Zone in Cloudflare.
- Validates the incoming request's parameters (IP Address, Hostname, Domain / Zone, and Cloudflare API Key).
- Locates the DNS zone and record based on the provided hostname and domain.
- Updates the DNS record with the new IP address.
Essentially, this Worker provides a secure and automated way to update your DNS records whenever your Unifi network detects an IP address change.
See the source code at tdharris/cloudflare-worker-dyndns for my Dynamic DNS Cloudflare Worker that will update the DNS record with the incoming IP address. It can be deployed to your Cloudflare account by cloning the repository and using the Wrangler CLI to publish the Worker, see Step "4. Deploy your project" from the Quick Start Guide.
Unifi Configuration: The Trigger That Keeps You Updated
Unifi provides a feature called "Dynamic DNS" that allows you to configure a custom script to run whenever the IP address changes. This is where we will configure the Unifi network to call the Cloudflare Worker endpoint every time the IP address changes.
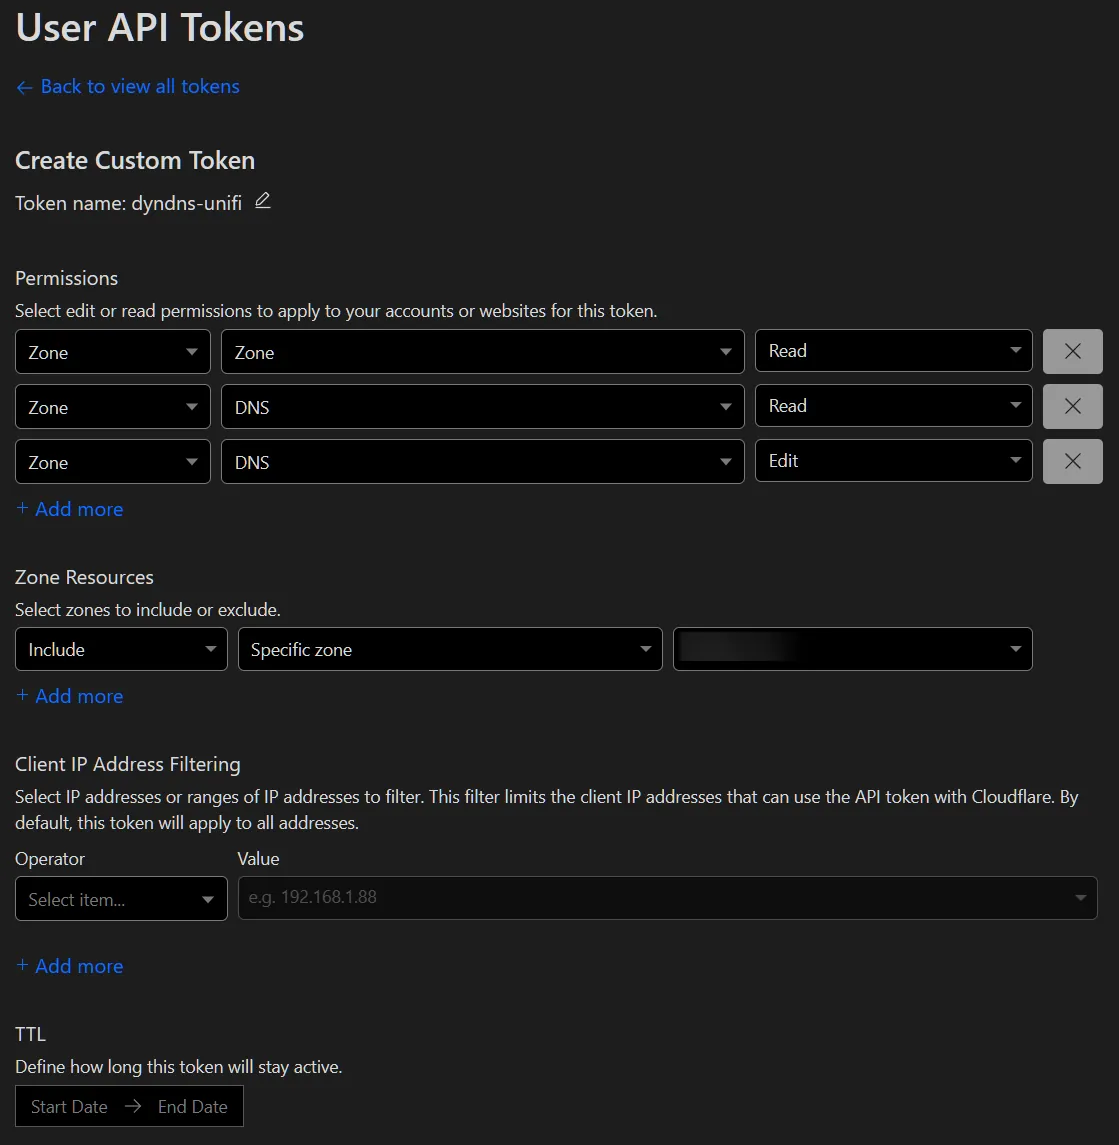
Create a Cloudflare API Token
For the Cloudflare Worker to interact with the Cloudflare API, you will need to create an API Token with the appropriate permissions. See the Cloudflare API Tokens documentation for more information on creating a token with the necessary permissions. Either a User or an Account API Token can be used.
For this use case, you will need the following permissions:
Zone:Zone:ReadZone:DNS:ReadZone:DNS:Edit
Configure Unifi Dynamic DNS
For more information, see the Unifi Gateway Dynamic DNS documentation. At the time of writing this, the following steps are how to configure the Unifi Gateway to call the Cloudflare Worker endpoint:
Open the Unifi Dynamic DNS Settings:
- Navigate to your Unifi Controller.
- Go to the
Settingstab. - Go to the
Internettab. - Select the appropriate
WANinterface. - Scroll down to the
Dynamic DNSsection. - Select
Create New Dynamic DNS.
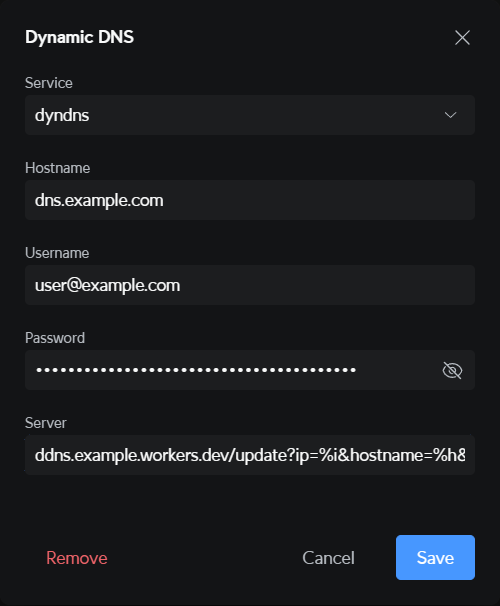
Configure the Dynamic DNS Settings:
- Service:
dyndns - Hostname:
dns.example.com- your primary DNS record. - Username:
[email protected]- your Cloudflare API Email Address. - Password:
xxxxxxxx- your Cloudflare API Token. - Server: The Cloudflare Worker endpoint URL with the following URI parameters:
ip:%i- The IP Address, provided dynamically by Unifi.hostname:%h- The Hostname, provided dynamically by Unifi.zone:example.com- The Zone Name, provided statically by you.
For example:
https://your-worker-subdomain.your-worker-name.workers.dev/update?ip=%i&hostname=%h&zone=example.com
Note:
- Replace
your-worker-subdomainandyour-worker-namewith your Cloudflare Worker subdomain and name. - Replace
example.comwith your Cloudflare Zone Name.
- Service:
Conclusion
And there you have it! You've now built your own dynamic DNS system using the combined powers of Cloudflare Workers and your Unifi network. No more worrying about IP address changes affecting your remote access. Whether you're running a homelab or hosting a personal website, this solution provides a reliable and efficient way to keep your DNS records up-to-date. So go ahead, embrace the dynamic world of IP addresses with confidence, knowing your domain or subdomain will always lead to the right place.